Semi top-down: thiết kế biện pháp từ mô hình Plaxis đến kingpostSemi top-down: designing the method from Plaxis to kingposts
Sáu giai đoạn thiết kế biện pháp semi top-down, những quyết định đầu vào quyết định tất cả, và ba công cụ tính online đi kèm.The six design stages of a semi top-down basement, the early decisions that drive everything, and three companion online calculators.
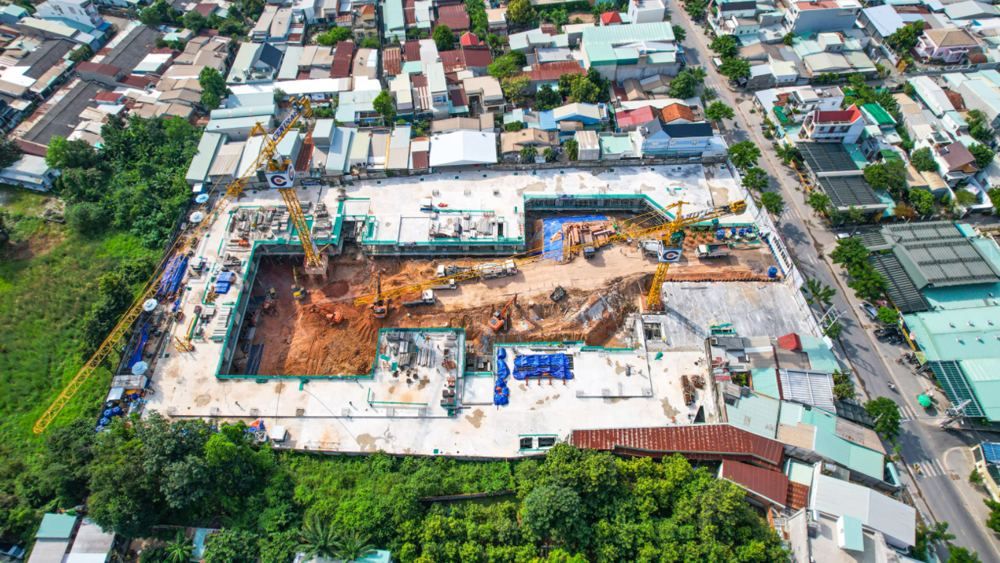
Ở bài Top-down hay Bottom-up? tôi đã so sánh các biện pháp thi công tầng hầm. Bài này đi sâu vào semi top-down: sàn hầm được thi công từ trên xuống và dùng chính nó làm hệ chống tường vây, nhưng phần thân phía trên chưa thi công song song (hoặc chỉ một phần). Đây là lựa chọn hay gặp ở công trình xây chen, nền đất yếu, nơi chuyển vị tường vây và lún nhà lân cận là rủi ro lớn nhất.
Khó khăn của semi top-down không nằm ở một phép tính nào, mà ở chỗ nhiều mô hình phải nói chuyện được với nhau: địa kỹ thuật (Plaxis), kết cấu tổng thể (ETABS) và sàn (SAFE), mỗi mô hình lấy đầu vào từ mô hình trước.
1. Trình tự thi công
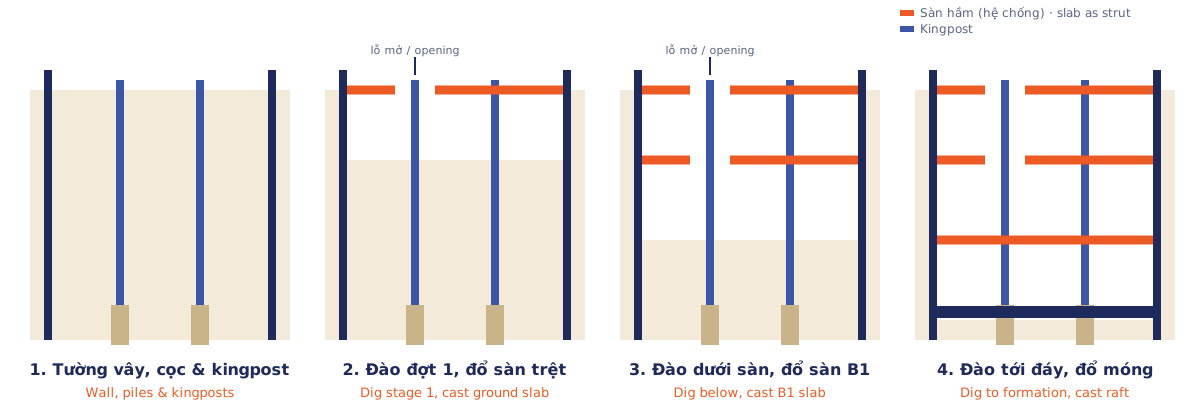
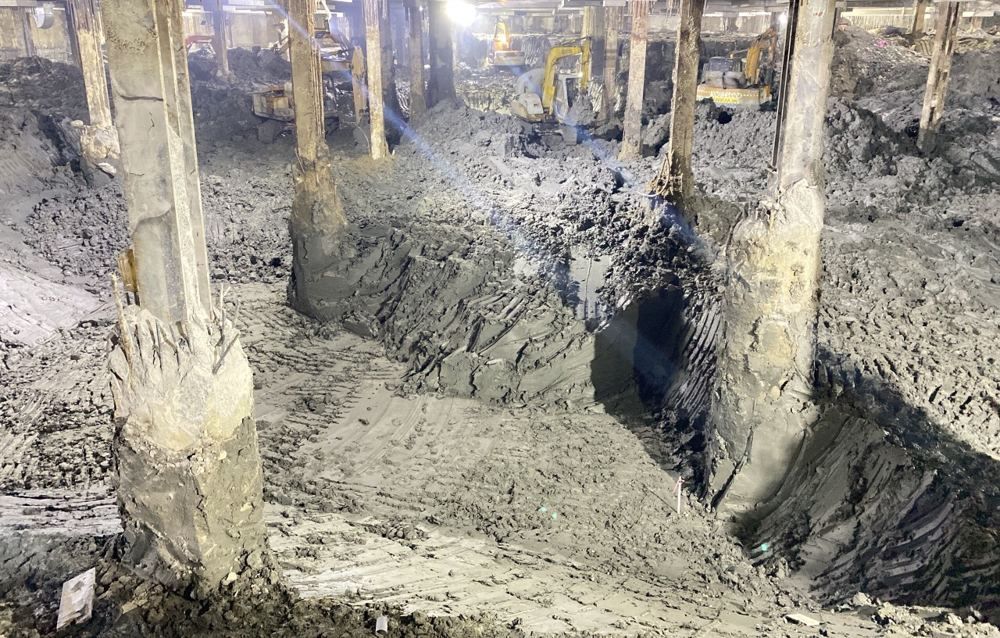
2. Sáu giai đoạn thiết kế
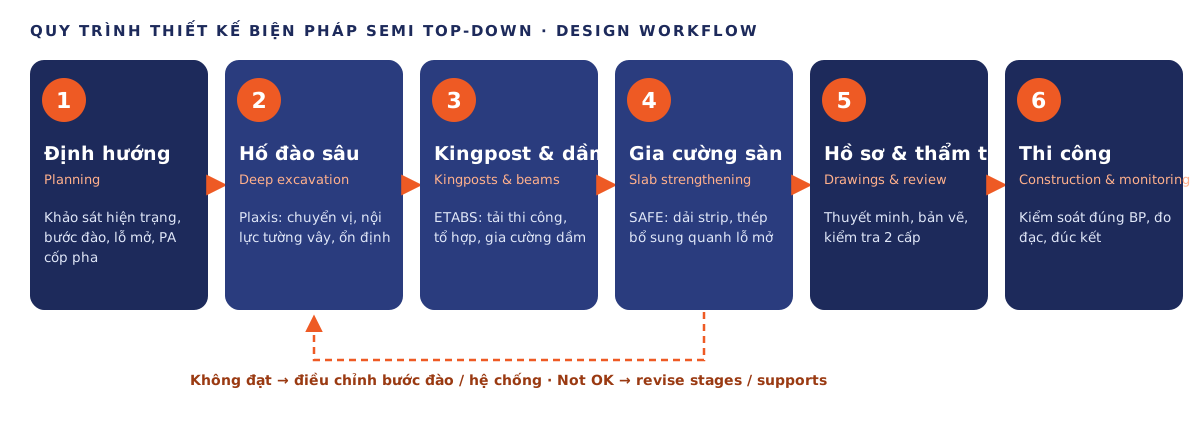
Giai đoạn 1 — Định hướng. Khảo sát hiện trạng (cao độ, công trình lân cận), đọc hồ sơ địa chất, rồi ngồi cùng giám đốc dự án, ban chỉ huy và bộ phận thiết bị để thống nhất ba việc:
- Các bước đào và cao trình đào — thi công sàn tầng trệt trước hay sàn B1 trước, có dùng sàn thao tác không.
- Phương án cốp pha sàn hầm — cốp pha đất (đào đến đáy dầm sàn), bê tông lót + ván, hay đào sâu hơn đáy dầm khoảng 2 m để dùng cây chống (thuận tiện thi công và nghiệm thu, nhưng đổi lại chiều dài tự do của kingpost và tường vây lớn hơn).
- Mặt bằng và lỗ mở — vùng xe chạy, vị trí lỗ mở lấy đất, ramp đất, và khu vực nào (nếu có) sẽ thi công phần thân song song.
Đây là giai đoạn ít phép tính nhất nhưng quyết định gần như mọi kết quả phía sau. Một lỗ mở đặt sai chỗ có thể khiến cả hệ sàn phải gia cường.
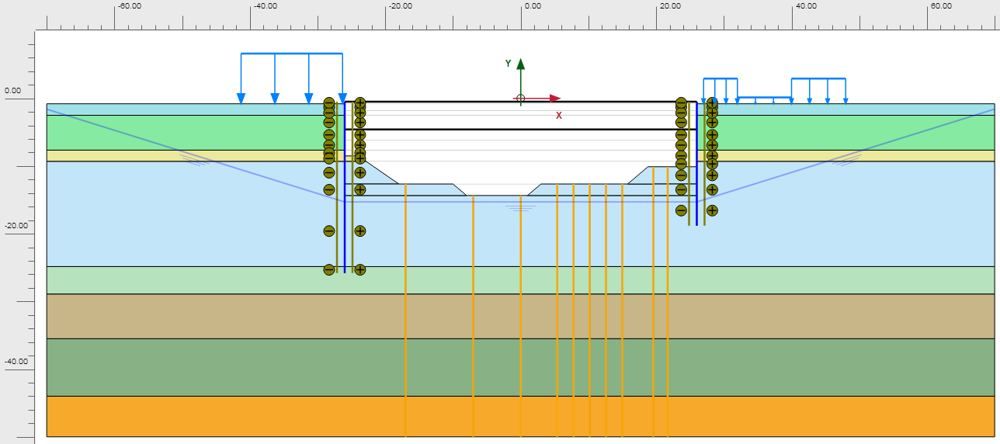
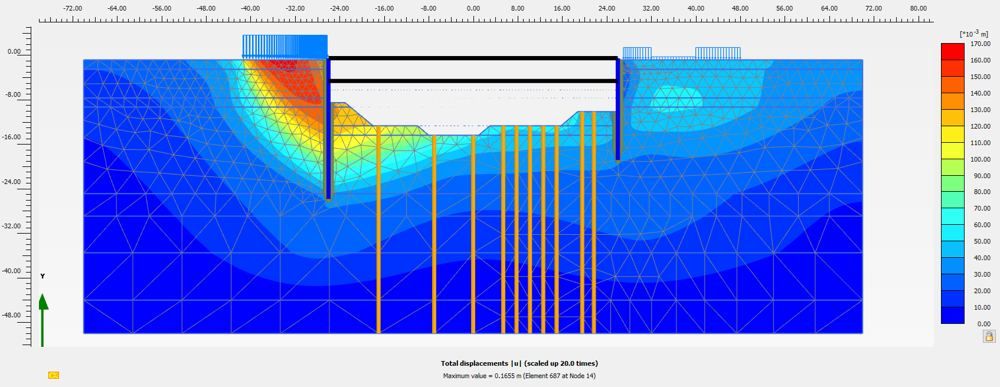
Giai đoạn 2 — Hố đào sâu (Plaxis). Đầu vào là các bước đào ở giai đoạn 1 và thông số đất từ hồ sơ khảo sát; đầu ra là chuyển vị, nội lực tường vây và ổn định hố đào. Điểm cần chú ý là độ cứng của sàn khi làm hệ chống: sàn có lỗ mở lớn không còn cứng như sàn đặc, vì vậy độ cứng dọc trục quy đổi phải giảm tương ứng với kích thước và vị trí lỗ mở — tốt nhất là lấy từ mô hình ETABS thay vì đoán.
Ở bước này cũng nên kiểm tra luôn ổn định đáy hố: đẩy trồi khi đáy nằm trong sét yếu, và cát sôi khi đào trong cát có mực nước ngầm cao.
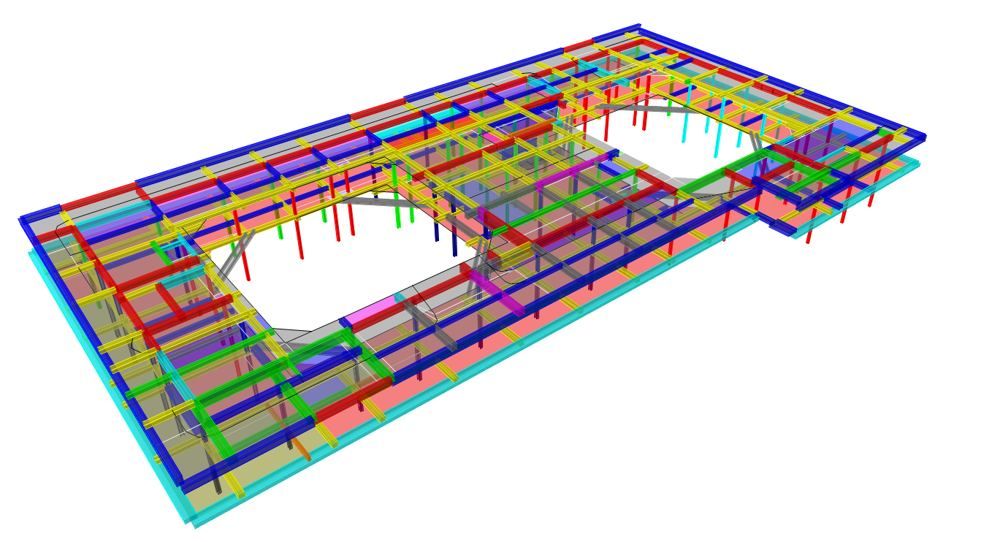
Giai đoạn 3 — Kingpost, gia cường dầm, hệ shoring (ETABS). Mô hình dầm sàn thực tế, gán tải trọng bản thân, tải thi công (vùng xe chạy lớn hơn nhiều so với vùng còn lại), tải đất đắp tại các vị trí giật cấp và tải ngang từ Plaxis. Vài nguyên tắc mô hình hóa:
- Cột và vách vĩnh cửu chưa làm việc trong giai đoạn này: vẫn vẽ vào mô hình nhưng giảm mô đun đàn hồi (ví dụ E/1000) để chúng không hút nội lực.
- Kingpost trùng vị trí cột quy đổi thành lực tập trung; chân kingpost liên kết khớp.
- Tổ hợp tối thiểu ba trường hợp: tĩnh tải + hoạt tải thi công, tĩnh tải + tải đất, và cả ba cùng lúc.
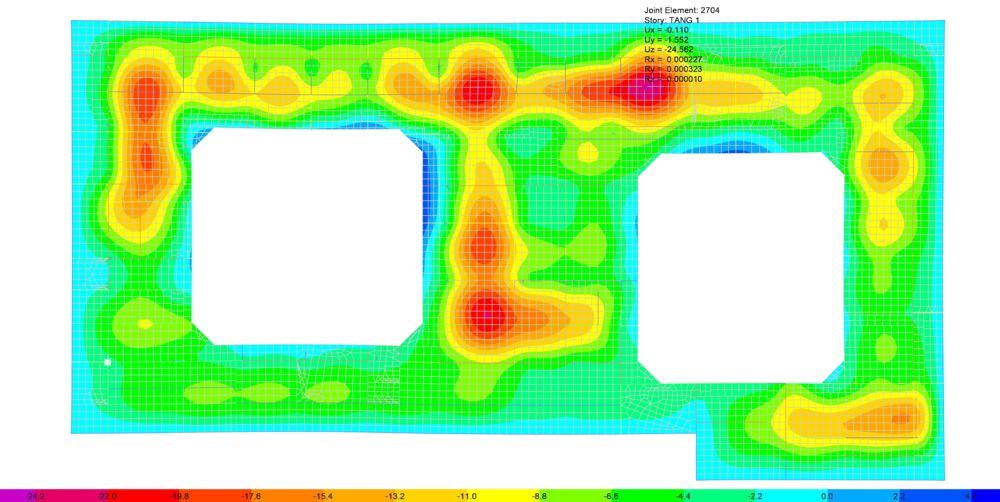
Giai đoạn 4 — Gia cường sàn (SAFE). Xuất mô hình từ ETABS sang SAFE kèm tải trọng từ các tầng trên, vẽ dải strip theo đúng phương bố trí thép để nội lực phản ánh đúng cách sàn làm việc, rồi so sánh thép yêu cầu với thép thiết kế để xác định thép bổ sung — thường tập trung quanh lỗ mở và đầu kingpost.
Giai đoạn 5 — Hồ sơ và thẩm tra. Thuyết minh phải ghi đủ dữ liệu đầu vào và tiêu chuẩn áp dụng; bản vẽ phải đủ chi tiết để ban chỉ huy triển khai được mà không phải đoán. Kiểm tra nội bộ hai cấp trước khi gửi thẩm tra.
Giai đoạn 6 — Thi công và đúc kết. Kiểm soát thi công đúng biện pháp đã duyệt, theo dõi quan trắc, và ghi lại những gì khác với dự báo để dùng cho dự án sau.
3. Kingpost — “chân” tạm của cả tòa nhà
Kingpost là cột thép hình (thường là H) cắm vào cọc khoan nhồi, đỡ toàn bộ hệ sàn cho đến khi cột vĩnh cửu được thi công. Ba điểm hay bị xem nhẹ:
- Chiều dài tính toán thay đổi theo từng bước đào. Phải xét đủ các trường hợp, đặc biệt ở lõi thang, cạnh lỗ mở — nơi kingpost có thể không được giằng ở một hoặc hai tầng.
- Mô men do sai số lắp dựng. Ngoài mô men từ mô hình, nên kể thêm mô men do độ nghiêng thi công (ví dụ N·H/150) nếu thiết kế yêu cầu.
- Liên kết kingpost – cọc khoan nhồi. Hai phương án phổ biến là không có hoặc có đinh chống cắt (shear stud). Với cọc đường kính nhỏ (dưới khoảng 1 m), phương án không đinh chống cắt thường dễ thi công hơn; lựa chọn cuối cùng phụ thuộc quy mô công trình, thiết bị và cách lắp dựng.
Để kiểm tra nhanh tiết diện, tôi đã dựng lại bảng tính thành công cụ online kiểm tra kingpost theo TCVN 5575:2012 — nhập nội lực từ ETABS và chiều dài tính toán, kết quả hiện ngay kèm diễn giải từng bước. Sàn tựa trực tiếp lên kingpost cũng cần kiểm tra chọc thủng quanh đầu kingpost.
Góc nghiên cứu
Bản sao số cho hố đào semi top-down
Trong semi top-down, mỗi bước đào là một “thí nghiệm” quy mô thật: tường vây chuyển vị, sàn nhận lực nén, kingpost nhận tải. Nếu gắn inclinometer trong tường vây và cảm biến biến dạng trên một số kingpost đại diện, ta có thể hiệu chỉnh ngược thông số đất trong Plaxis sau mỗi bước đào (back-analysis, cập nhật Bayes), rồi dự báo lại cho bước tiếp theo với độ tin cậy cao hơn.
Đó là hướng tôi muốn theo đuổi: biến mô hình thiết kế tĩnh thành mô hình “sống”, cập nhật theo dữ liệu công trường và hỗ trợ quyết định đào tiếp hay dừng lại.
In Top-down or bottom-up? I compared basement construction methods. This article goes deeper into semi top-down: basement slabs are built from the top down and used as the strutting system for the diaphragm wall, but the superstructure is not built in parallel (or only partly). It is a common choice on tight urban sites with soft ground, where wall deflection and settlement of neighbouring buildings are the biggest risks.
The difficulty of semi top-down is not any single calculation. It is that several models have to talk to each other: geotechnical (Plaxis), global structural (ETABS) and slab (SAFE), each taking its input from the one before.
1. Construction sequence
2. Six design stages
Stage 1 — Planning. Survey existing conditions (levels, neighbouring structures), study the site investigation, then sit down with the project director, site team and plant department to agree on three things:
- Excavation stages and levels — ground slab first or B1 first, and whether a working platform is used.
- Basement slab formwork — earth-formed (excavate to the soffit), blinding plus plywood, or excavating about 2 m below the beam soffit to use props (easier to build and inspect, but at the cost of longer unbraced lengths for kingposts and walls).
- Layout and openings — truck routes, muck-removal openings and ramps, and which zones (if any) will build the superstructure in parallel.
This stage has the fewest calculations but drives almost every result that follows. One badly placed opening can force strengthening of the whole slab system.
Stage 2 — Deep excavation (Plaxis). Inputs are the stages from Stage 1 and soil parameters from the site investigation; outputs are wall deflection, wall forces and excavation stability. The key subtlety is slab stiffness as a strut: a slab with large openings is far less stiff than a solid one, so the equivalent axial stiffness must be reduced according to the size and position of the openings — ideally taken from the ETABS model rather than guessed.
This is also the moment to check base stability: basal heave when the formation is in soft clay, and sand boiling when excavating in sand with a high water table.
Stage 3 — Kingposts, beam strengthening, shoring (ETABS). Model the actual beams and slabs, with self-weight, construction loads (much higher in truck zones than elsewhere), fill loads at level changes and lateral loads from Plaxis. A few modelling rules:
- Permanent columns and walls are not yet working: draw them, but reduce their elastic modulus (e.g. E/1000) so they attract no force.
- Kingposts coinciding with columns are converted to point loads; kingpost bases are pinned.
- Use at least three combinations: dead + construction live, dead + earth load, and all three together.
Stage 4 — Slab strengthening (SAFE). Export from ETABS to SAFE with the loads from above, draw strips along the actual reinforcement directions so the forces reflect how the slab really works, then compare required and provided steel to define additional bars — usually around openings and kingpost heads.
Stage 5 — Drawings and review. The calculation report must state all inputs and standards; drawings must be detailed enough for the site team to build without guessing. Two levels of internal checking come before external review.
Stage 6 — Construction and lessons learned. Make sure the approved method is what gets built, follow the monitoring, and record where reality differed from the prediction for the next project.
3. Kingposts — the building’s temporary legs
Kingposts are steel sections (usually H) plunged into bored piles, carrying the whole slab system until the permanent columns are built. Three points are often underestimated:
- Effective length changes with every excavation stage. Check all cases, especially at cores and openings, where a kingpost may be unbraced over one or two storeys.
- Moments from erection tolerance. Besides the modelled moments, add the moment from construction out-of-plumbness (for example N·H/150) where the design requires it.
- Kingpost-to-pile connection. The two common options are with or without shear studs. For small piles (below about 1 m diameter), the no-stud option is usually easier to build; the final choice depends on the project scale, equipment and erection method.
For quick section checks I rebuilt the spreadsheet as an online kingpost calculator to TCVN 5575:2012 — enter the ETABS forces and effective lengths, and the results appear instantly with every step explained. Slabs bearing directly on kingposts also need a punching shear check at the kingpost head.
Research angle
A digital twin for semi top-down excavations
In semi top-down, every excavation stage is a full-scale experiment: the wall deflects, the slabs take compression, the kingposts take load. With inclinometers in the wall and strain gauges on a few representative kingposts, soil parameters in Plaxis can be back-calculated after each stage (back-analysis, Bayesian updating) and the next stage re-predicted with more confidence.
That is the direction I want to pursue: turning a static design model into a living model, updated with site data to support the decision to keep digging or to stop.
Nội dung thể hiện kinh nghiệm và quan điểm cá nhân, được khái quát hóa và không đại diện cho bất kỳ công ty, chủ đầu tư hay dự án cụ thể nào. This article reflects personal experience and opinion, generalised for sharing; it does not represent any specific company, client or project.